Saturday, March 09, 2013

As The Sewing Machine Turns...

 ... the supervisor supervises!

Back to working on my paper piecing project from the Judy Niemeyer workshop at Asilomar.

It doesn't look very colorful from the back, because about all you can see is the paper and a little bit of the red overhanging the edges.

This set of wedges has five different red fabrics. They are quite bright but not really as orangey as they look in the pictue.

 My work area--the Brother has been moved aside so I can use the table for cutting and pressing.

The card table holds all the extra stuff.

Pay no attention to the stack of UFOs on the other card table. They'll get their turn.

Honest.
 While I've been machine sewing on the paper piecing, I've also been stitching down binding.

Finally got this one done last night, so today while I was sewing, it went into the washer and dryer for its fluff-and-fold cycle.

It sorta needed it, after being carted around all over the place! It went to Asilomar last spring, for a class on machine quilting with Sue Rasmussen, who does gorgeous machine quilting and is a very very good teacher.


I had wanted to get my Brother out of its box--I got it shortly before the back injury that culminated in surgery in 2011--and since this quilt, and one other that came from the Liebermans, were pinned and ready to go, well--perfect for the situation.

Sewing this much binding is a lot of work. So is quilting a quilt this size.

However, as Brenda Papadakis has been quoted often, "Done is better than perfect."  And it will soon be sent along to a new home, where I hope it will be loved and cherished!
 Thought I'd post a few process pictures of the paper piecing in progress (say that three times fast!). I am blown away by the precision and the depth of thought that went into this whole pattern and the process of putting it together!

These are parts of the center feathered star medalllion. There are eight of them.

Eight.

These have been laid out ready to sew--the next piece has been added and the seam allowances on these long skinny bias strips has been tacked down with fabric glue.

Not a lot, just enough to keep them from slipping around when they're sewn.

See?

Look at that long skinny point.

Eight of them.


 By the way, I am amazed and delighted at how fast and comfortable sewing these on my beloved 1230 goes. Not that the Activa, which I took to Asilomar with me (it weighs a metric ton or two less than the 1230) isn't a good machine, because it is.

It just lacks a couple of the features that are making this so easy on the 1230. Like being able to control the needle up/down with the foot pedal.

I love this machine, have since I bought it back in the late 80's. One of those purchases that I've just never regretted. I kind of put it in the same category of "great tools" as my Kitchen Aid mixer (1984 and still going strong) and my Cuisinart food processor (1982 and as tough as it was the first day). All of these machines have seen plenty of heavy use over the years, and they have held up and just keep right on doing what they are asked to do.

Okay, back to the quilt.

I'm using the same press-and-cut board setup I had in place at Asilomar. The little iron is an under-$10 travel iron from Target, and it works really really well for this. Just the right size--small enough to handle easily but big enough so it doesn't feel like a toy.


Trimming the seam allowance using a plastic template and an
Add-a-Quarter ruler.  (Sorry if this sounds like a commercial, I just really like good tools that aren't gadgets, if you know what I mean!)

I've still got lots more pieces to add to these, but it was time to quit for the night.

 I'll finish up with a couple of "springy" pictures in case you're in the mood.

The liquidambar tree is budding out already. The last of the burrs are still hanging on and it's already getting ready to make new ones!


 Really, tree?

Actually, it's two trees, which came home in milk cartons back when Jeff and Jennie were in the fourth grade (not the same year, of course). Stuck them in the ground and they are now very very tall.

Citrus season. These are the trees "Uncle Eddie" planted in the little strip between our driveways so that "the kids can have some fruit."

Last but not least, here's little Shyla, curled up on "her" bed. She was watching me fold towels on the foot of the bed and didn't seem at all bothered.

Quite a change for the shy little girl who was hiding in closets and under things only a year or so ago! She really does want to be a pet.

Tuesday, March 05, 2013

Bloomin' Time!

Trying to cheer up my indoor environment so I got a couple of new pillows for the sofa, and threw a quilt over it.

Kind of bright, but it looks happy and springy.

Not very Easter-y, but that's okay. I like this quilt and it came out very well. Sometimes I do need a reminder or two that I occasionally finish stuff.


 Dandelions have cropped up everywhere in my poor neglected yard, but they are still pretty. I love me a dandelion puff. Maybe that's one reason I don't work too hard at eradicating them.

Hey, they bloom.
 So do the camellias. All of my camellias are looking sickly this year, which has me worried. I guess I need to get some camellia food and get busy feeding the poor things.

Is there anything sadder than a spindly, sparse 20-foot-tall camellia?
 Thank goodness for bulbs! At least they've come back this year. These daffs are under the jacaranda tree, which used to be a lovely flower bed.

Now it's a wasteland. Sigh. Oh for the energy--and the knees--I used to have to keep this all up!


 Let's talk of cheerier things--like quilts! These two are from tonight's class.

Here's Anne's take on "modern" quilting. Very successful. By the time she left tonight, she had finished the quilting and put on a binding.

Anne has lots and lots of scraps, so she's always looking out for a way  to use them up creatively.

Can you see how she quilted it??
 This one is Ethel's.

That stripe is BRIGHT!

She got this one layered and ready to quilt tonight.

All in all, a productive and fun night at class!

An FO, and Some Travels

 I fell in love with this idea: old salt shakers, filled with tiny buttons! These are less than 3" tall and the buttons inside are teeny, not doll sized but definitely very small.

One of the vendors at the Pajaro Valley Quilt Show had racks of them. Took me a long time to decide on these two, and it took a lot of self-restraint not to buy more. But really, I have lots of buttons and lots and lots of glass containers for them. Just need to "do this" if I want more!

Hmmm... might be something to think about doing with some of Himself's glass. I know there are salt and pepper shakers, just don't think any of them are clear.

On to my first FO of the month! Technically this should go in the Feb. list, because it was all done but the washing before I left for Asilomar.

Ragg quilts are fun to make till you get to the snipping part, and then it helps if there is something semi-interesting to watch. Not too interesting, of course, because then attention has to be paid to the screen and not to the quilt!  When that happens, it's all too easy to snip a finger instead of the flannel...

Anyway, this one is for Debby, aka Middle Kid/Second Daughter. I had sent a smaller version of this to her granddaughter, Paige, and the request came back for one for her too. So here it is, and it will be off to Vegas as soon as I can find a box for it.
 Well, I'll also have to print out a label, or use the walkup self-service machine at the post office.

Not only was my printer giving me problems, I came home to a mostly-dead computer. (This is being typed on the laptop. I said a couple of weeks ago that I don't like blogging on the laptop... I guess the Universe heard me and is saying, oh yeah, see how you like this!) Anyway, the desktop has been dismantled and delivered to a friend who is very very good with that sort of thing, who will conduct an exam--hoping it won't be an autopsy!
Quilt came out nice and soft and snuggly--just what they need for a Vegas winter!
Not too sure about the order these pictures came out in, but anyway, here's a couple of shots from the drive home last Saturday.

This is a big rock that sits between the NB and SB lanes of the 101 at Pismo Beach. There is a name for this kind of formation--Morro Rock is another one, though much much larger--I knew the name once upon a time but haven't been able to remember it for years now.

So this was our lunch stop.  The sky was a glorious blue and the clouds were pretty amazing.

Looking out over the beach, it was cloudier and greyer. I do still love this drive, or at least the parts of it that skim the edge of the ocean.

The interior part of the drive was good, though, since it's just coming on spring and the hills are green and the fields are full of sprouting plants.

The grapevines--and vineyards have sprouted up everywhere--are still dormant. There were a few fields where new vines were being planted, and it was fun to see those.

Closer view of the rock. It's no wonder they built the freeway around it!

So, backing up to the seminar at Asilomar, here's a couple of pictures of my project for the week.

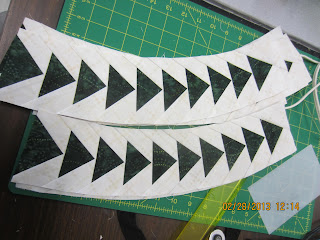
First up, my Flying Geese strips. There are 8 of them and this is two full days' worth of sewing. Even with chain piecing, it's a lot of sewing.

The teacher for this session, Judy Niemeyer of Quiltworx,  is quite possibly the most organized person I have ever met! Her patterns are meticulously drafted, her methods are simple and logical.

My mind is neither simple nor logical, but I was able to do this!  You may have seen my pictures from before I left (if not, they're on my Flickr page) where I had cut all the pieces out using the templates provided, and put them all in bags labeled to where they would go.

That made it so easy when it was time to start sewing! Judy had some cool tricks for keeping the pieces lined up in the order they'll be sewn, and using a fabric glue pen to keep long thin slices from moving around.

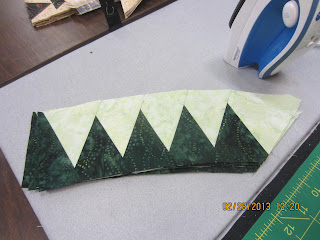
See those long thin points? Yeah, those pieces are VERY long and all cut on the bias.

Don't worry, I'm not going to go over the whole method with you. I'd say, if you ever feel as if you'd like to do one of her patterns--and they are beautiful, and well worth the time and $$ investment--try to get a class with her or one of her Certified Instructors.

Yeah, that whole certification system? Brilliant. One of the women in my group (Hi, Marilyn!) is in the process of being certified. It isn't a quick easy process, but it does mean that if you take a class from one of them, you might as well be taking it with Judy herself.

Well, except for her wit and warmth.

These "spikes" were the first things I sewed. A day and a half.

You can see some of the setup we had: Louise and I each had our own table, with my folding ironing pad/cutting board on the far left edge of mine. We both used the pressing surface and the little travel iron--which I love, and which was $10 at Target--and I cut on the board. She had her board set up just to the right of her machine.

This is what Louise had on her board for the Thursday afternoon walkaround--most of a completed wedge, and the front of the pattern.

You can click on the picture to see more.

By the time we packed up on Friday, she had one wedge completed, and all the components ready for assembly of the other 7. I had the pieces you see above, plus about two rows done on those light-colored sections between the geese and the spikes.

If it hadn't been for unpacking, and fiddling with the ded computer (not to mention cleaning out my "file" drawers where I toss all the disks and documentation for all my computers, ipods, etc etc, so I could find the installation disks for the  ded thing. Hey, it works, I found them...) I might have been able to sew a little more on this.

Maybe today.

I'll leave you with a picture oof sunrise at Asilomar. I miss it already.